
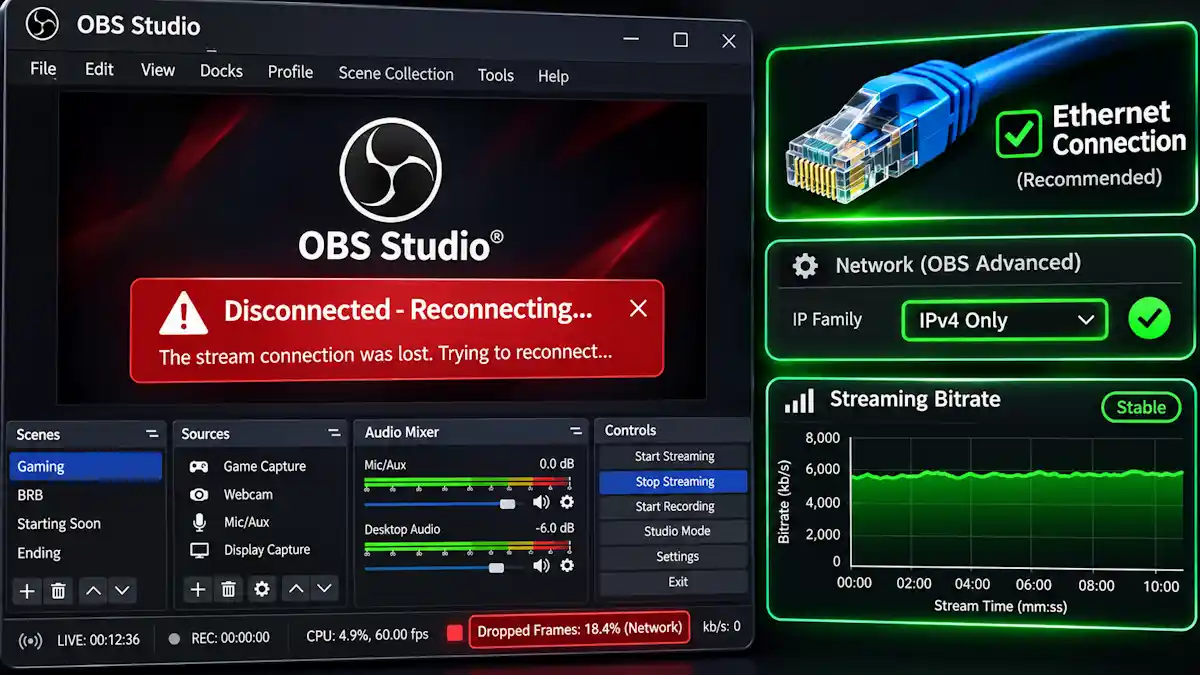
Quick Summary / The 30-Second Fix:
To immediately fix dropped frames and disconnection issues in OBS Studio, set your IP Family to IPv4 Only, enable Dynamically change bitrate to manage congestion under Advanced Settings, and switch your Downscale Filter from Lanczos (36 samples) to Bicubic (16 samples) if your GPU render time exceeds 2.5ms.
System & Hardware Compatibility: Works on Windows 11 (23H2 / 24H2 / 25H2+) | macOS Sequoia & Tahoe | OBS Studio v31, v32, v33+ | NVIDIA GeForce RTX 30 / 40 / 50-Series (Blackwell) & AMD Radeon RX 7000 / 9000-Series (RDNA 4)
Nothing kills viewer retention faster than a red status indicator and a dead RTMP stream during a high-stakes match. Before changing random encoder settings to fix dropped frames and disconnection issues in OBS Studio, you need to isolate whether your network socket, GPU render pipeline, or hardware encoder is choking.
⚠️ Safety Precaution & Profile Backup Warning:
Before modifying Windows TCP/IP socket pools, uninstalling network optimization suites, or changing registry-level adapter states, back up your existing setup. In OBS Studio, click Profile – Export and Scene Collection – Export to save your configurations to an external folder. Also create a Windows System Restore Point before running elevated
netshcommand-line resets.
Step 0: Diagnose the Root Cause via OBS Stats & Log Analyzer
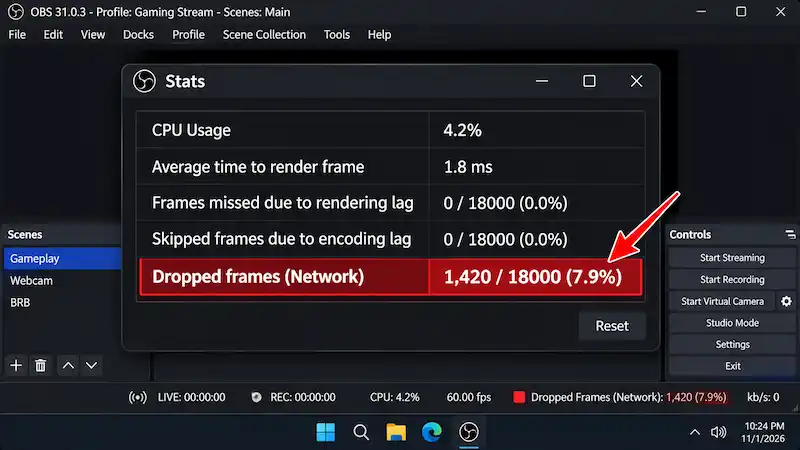
Don’t guess which setting is broken—OBS tracks the exact subsystem causing every dropped frame.
- Open OBS Studio and click Docks – Stats from the top menu bar to open the real-time telemetry window.
- Run a live test broadcast for 3 minutes while playing your main game at full load.
- Alternatively, go to Help – Log Files – Upload Last Log File, copy the URL, and paste it directly into the Official OBS Studio Log Analyzer for automated bottleneck detection.
- Inspect the four critical telemetry readouts in the Stats dock:
- Dropped Frames (Network): Your upstream bandwidth, router buffer, or RTMP/SRT ingest server rejected outbound TCP packets. This is the #1 cause of endless stream disconnection loops.
- Frames Missed Due to Rendering Lag: Your GPU’s 3D engine is pinned at 99–100% utilization by your game, starving OBS of Direct3D/VRAM resources. (If high GPU load triggers a complete software freeze, follow our guide to fix OBS Studio crashing with no error message on Windows).
- Skipped Frames Due to Encoding Lag: Your hardware encoder chip (NVENC / AMF / QuickSync) or CPU (x264) cannot compress frames within the required 16.6ms (60 FPS) window.
- Average Time to Render Frame: Must remain well below 16.6ms for 60 FPS streams (ideally under 2.5ms).
| Telemetry Symptom | Exact Root Cause | Immediate 10-Second Fix |
| Dropped Frames (Network) greater than 1% | ISP upload jitter, dual-stack IPv6 routing glitch, or ingest overload | Enable Dynamic Bitrate & lock IP Family to IPv4 Only |
| Rendering Lag / Render Time greater than 10ms | Uncapped in-game FPS + heavy scaling (e.g., Lanczos 36 samples) | Cap in-game FPS, run OBS as Admin, switch to Bicubic |
| Skipped Frames (Encoding Lag) | NVENC multipass set to Full Resolution + Look-ahead enabled | Set Multipass Mode to Single Pass & Preset to P4/P5 |
| Sudden Disconnect / Reconnect Loop | Killer NIC / OEM traffic shaper or Ethernet Energy Efficient mode | Disable NIC power-saving & set IP Family to IPv4 Only |
1. Fix Dropped Frames and Disconnection Issues in OBS Studio via Advanced Network Binding
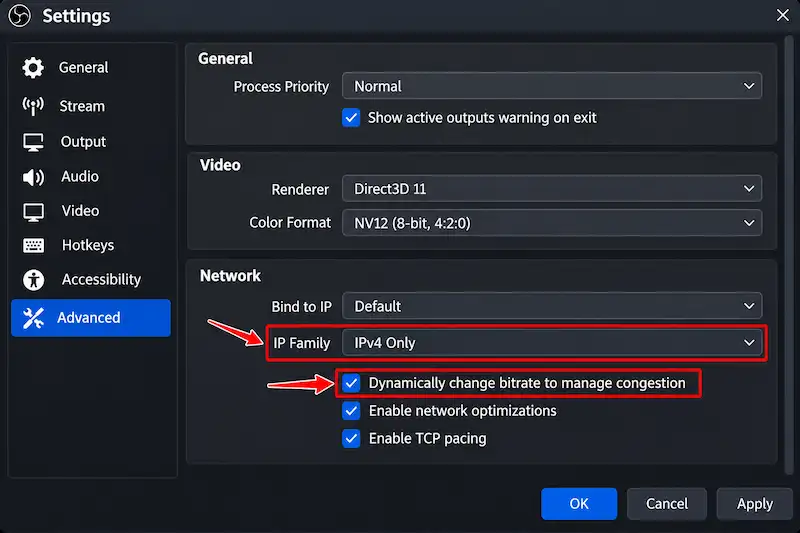
By default, Windows routes OBS traffic across dynamic dual-stack interfaces, which causes immediate RTMP disconnects if your router hiccups on IPv6 lease renewals. You can verify official network stack parameters in the OBS Studio Stream Connection Troubleshooting Knowledge Base.
- Open OBS and go to File – Settings – Advanced.
- Scroll down to the Network section at the bottom.
- Change IP Family from IPv4 and IPv6 to IPv4 Only to prevent dual-stack routing drops.
- Keep Bind to IP set to Default for standard home networks. (Note: Only bind to a specific
192.168.1.XXIP if you use a static local IP or want to bypass virtual VPN adapters; otherwise, leave Bind to IP on Default and simply set IP Family to IPv4 Only). - Check Dynamically change bitrate to manage congestion so OBS automatically scales down your bitrate during ISP micro-stutters instead of dropping frames or disconnecting.
- Check Enable network optimizations and Enable TCP pacing to smooth out packet bursts on the wire.
- Click Apply and OK.
- Verification: Start a stream and inspect the bitrate square in the bottom-right corner of OBS; it will stay green and smoothly adjust Kbps numbers during congestion rather than turning red.
2. Optimize Downscale Filters (Why Lanczos 36-Sample Scaling Triggers Rendering Lag)
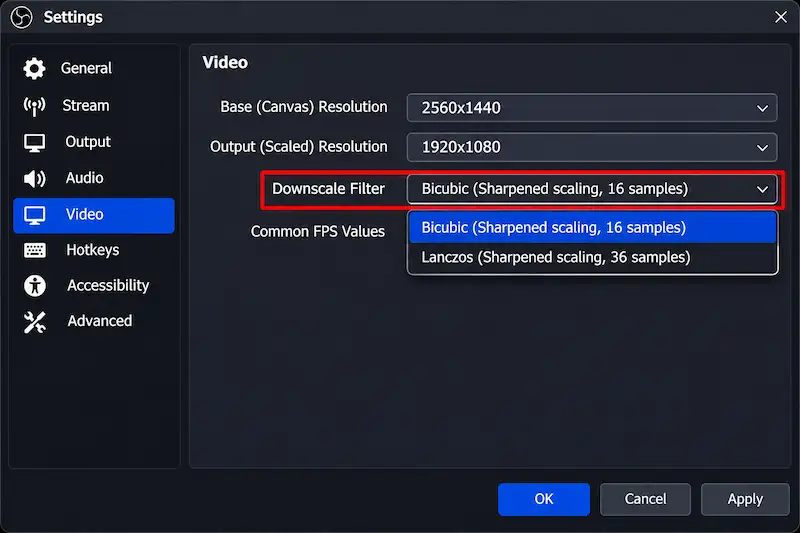
If you configured your video settings to use high-tap spline downscale filters—specifically Lanczos (Sharpened scaling, 36 samples) or custom third-party shader filters—while running high canvas resolutions, your GPU shader cores can bottleneck during intense gaming moments.
- Go to File – Settings – Video.
- Verify your Base (Canvas) Resolution matches your native monitor resolution (e.g.,
2560x1440or1920x1080). - Set your Output (Scaled) Resolution to your target stream resolution (e.g.,
1920x1080for YouTube/Twitch or1280x720for low-bandwidth setups). - Click the Downscale Filter drop-down menu:
- If Average time to render frame in your Stats dock is creeping above 5.0ms, switch from Lanczos (Sharpened scaling, 36 samples) or Area to Bicubic (Sharpened scaling, 16 samples).
- If your Base and Output resolutions are both identical (e.g.,
1920x1080to1920x1080), downscaling is bypassed, so you must check individual scene sources by right-clicking your Game Capture source – Scale Filtering and setting it to Disable or Bicubic. (If changing scaling filters causes your capture feed to go blank, follow our fix for OBS game capture black screen on Windows 11 or OBS capture specific window black screen).
- Click Apply and OK.
- Verification: Check Average time to render frame in the OBS Stats dock; it should drop below 2.0ms immediately.
3. Configure CBR Bitrate & Ingest Server Limits
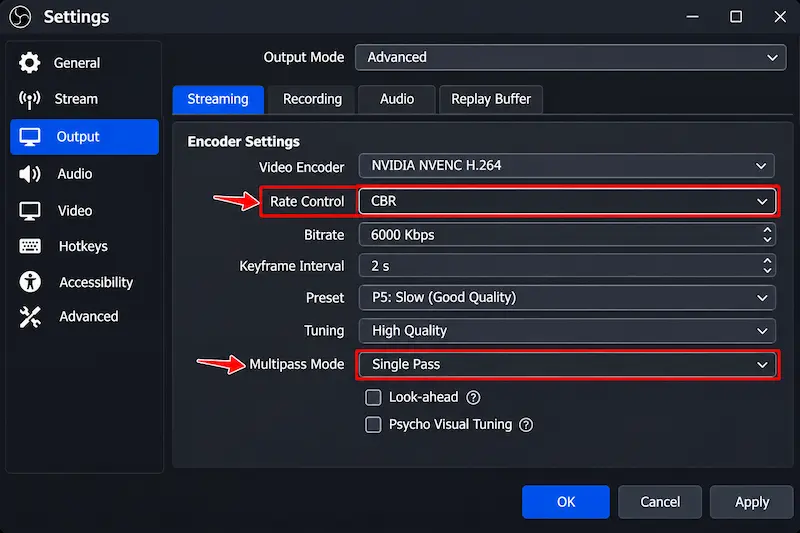
Pushing an unstable Variable Bitrate (VBR) or exceeding platform ingest caps causes immediate TCP buffer overflows and server-side disconnects. Check the Official Twitch Broadcasting Guidelines to match your resolution to the exact bit budget.
- Navigate to File – Settings – Output and change Output Mode at the top to Advanced.
- Select the Streaming tab.
- Set Audio Encoder to FFmpeg AAC and Video Encoder to NVIDIA NVENC H.264 (for Twitch) or NVIDIA NVENC AV1 / HEVC (for YouTube).
- Under Encoder Settings, set Rate Control strictly to CBR (Constant Bitrate).
- Set your Bitrate to no more than 75% of your sustained upload speed:
- 1080p 60fps:
6000 Kbps(Twitch ceiling) to8000 Kbps. - 720p 60fps:
4500 Kbps.
- 1080p 60fps:
- Set Keyframe Interval to 2 s.
- Set Preset to P4: Medium (Medium Quality) or P5: Slow (Good Quality).
- Set Multipass Mode to Single Pass or Quarter Resolution (Full Resolution uses extra CUDA passes that cause encoding lag).
- Uncheck Look-ahead and Psycho Visual Tuning (Look-ahead dynamically shifts B-frames and uses CUDA cores, which spikes encoding lag in fast-paced shooters).
- Go to Settings – Stream and change Server from Auto to the closest geographical ingest server with the lowest ping.
- Verification: Watch Skipped frames due to encoding lag in the Stats dock; it must stay locked at 0 / 0 (0.0%).
4. Prioritizing OBS GPU Scheduling & Fixing Capture Conflicts
When Windows 11 prioritizes your game’s DirectX 12 render queue over OBS, your stream stutters violently even while your in-game FPS looks high.
- Close OBS Studio completely.
- Right-click your OBS Studio desktop shortcut and select Properties.
- Go to the Compatibility tab, check Run this program as an administrator, and click Apply – OK.
- Update to the latest clean Game Ready or Studio branch from the Official NVIDIA Driver Downloads Portal to patch NVENC SDK memory leaks.
- Cap your in-game framerate to 10% below your GPU’s maximum ceiling using your game’s internal limiter or NVIDIA Control Panel so OBS always retains 5–10% GPU headroom.
- If you use an external HDMI/PCIe capture card alongside your GPU and experience frame drops or blank feeds, check our dedicated guide to fix capture card black screen in OBS.
- Verification: Launch your game and open Windows Task Manager (
Ctrl + Shift + Esc); confirm GPU 3D utilization hovers between 85% and 92%, never pinning at 100%.
5. Strip Out OEM Network “Boosters” & NIC Power Saving
Pre-installed motherboard utilities (such as Killer Intelligence Center, Lenovo Vantage Network Boost, ASUS GameFirst VI, and cFosSpeed) aggressively throttle background upload streams so your game gets priority—which causes OBS to drop thousands of frames and disconnect.
- Press
Win + R, typeappwiz.cpl, and press Enter. - Locate and uninstall any third-party packet shaping software: Killer Control Center, ASUS ROG GameFirst, MSI LAN Manager, or Gigabyte cfosSpeed (for Lenovo laptops, open Lenovo Vantage and toggle Network Boost to Off).
- Right-click the Windows Start button and open Device Manager.
- Expand Network adapters, right-click your Ethernet controller (e.g., Intel Ethernet Controller I225-V/I226-V or Realtek Gaming 2.5GbE), and click Properties.
- Select the Power Management tab and uncheck Allow the computer to turn off this device to save power.
- Select the Advanced tab and configure these exact properties:
- Energy Efficient Ethernet (EEE): Set to Disabled.
- Green Ethernet: Set to Disabled.
- Interrupt Moderation: Set to Disabled (reduces packet batching latency).
- Click OK and reboot your PC.
- Verification: Reopen Device Manager after rebooting to confirm the Power Management checkbox remains cleared.
6. Flush Corrupted Windows TCP Sockets & Firewall Rules
Corrupted Winsock catalogs or aggressive Windows Defender packet inspection can silently sever outbound RTMP connections on port 1935.
- Right-click the Windows Start button and select Terminal (Admin) or Command Prompt (Admin).
- Run the following network reset commands one by one, pressing Enter after each:
netsh winsock resetnetsh int ip resetipconfig /releaseipconfig /renewipconfig /flushdns
- Press
Win + Ito open Windows 11 Settings, then navigate to Privacy & security – Windows Security – Firewall & network protection. - Click Allow an app through firewall – Change settings – Allow another app.
- Browse to
C:\Program Files\obs-studio\bin\64bit\obs64.exe, add it, and ensure both Private and Public boxes are checked. - Verification: Restart your PC and launch a test stream; OBS should connect to the ingest server in under 1.5 seconds without hanging on “Connecting…”.
7. Isolate Broken Browser Sources & Virtual Camera Hooks
After updating to OBS Studio v33+, outdated CEF (Chromium Embedded Framework) browser docks or broken virtual camera hooks can cause severe main-thread stalls, resulting in dropped frames and sudden disconnects.
- Test your setup without third-party plugins by clicking Help – Restart in Safe Mode inside OBS.
- If Safe Mode eliminates your frame drops, go to Settings – Advanced – Sources and uncheck Enable Browser Source Hardware Acceleration (or re-enable it if your CPU is pegged at 100%).
- If you experienced sudden crashes or black screens right after updating to v33, follow our walkthrough on the OBS Studio 33.0.0 crash fix and Discord black screen.
- Additionally, if you pipe your OBS feed into Discord and experience driver conflicts, see how to resolve Discord not detecting OBS virtual camera or fix OBS virtual camera not showing up.
- Verification: Run a 10-minute test recording and stream in Safe Mode; confirm zero dropped frames in the OBS Stats dock before re-enabling plugins one by one.
Common Mistakes to Avoid
- Trusting Speedtest.net for streaming stability: Standard browser speed tests only measure burst upload speed over multi-connection HTTP for 10 seconds, hiding the single-thread TCP packet loss and router bufferbloat that destroy sustained RTMP streams.
- Enabling “Rescale Output” in two places at once: Checking Rescale Output inside Settings – Output – Streaming when you already configured your scaled resolution inside Settings – Video forces your GPU or CPU to scale the video twice, doubling rendering lag.
Frequently Asked Questions (FAQs)
How do I permanently fix dropped frames and disconnection issues in OBS Studio when my upload speed is fast?
High upload speed doesn’t prevent ISP routing jitter or dual-stack IPv6 drops. To permanently fix dropped frames and disconnection issues in OBS Studio, go to Settings – Advanced – Network, set IP Family to IPv4 Only, keep Bind to IP on Default (unless using a static local IP to bypass VPNs), and enable Dynamically change bitrate to manage congestion.
Why does OBS disconnect and reconnect every few minutes on Windows 11?
Constant disconnect/reconnect loops happen when OEM traffic-shaping bloatware (like Killer Intelligence Center, Lenovo Network Boost, or ASUS GameFirst) throttles OBS’s outbound TCP port 1935, or when Windows 11 puts your PCIe Ethernet controller into Energy Efficient Ethernet (EEE) power-saving mode. Disabling EEE in Device Manager and uninstalling network “booster” apps resolves this.
Which Downscale Filter gives the sharpest quality without dropping frames in OBS?
Bicubic (Sharpened scaling, 16 samples) is the sweet spot for competitive gaming streams. While Lanczos (36 samples) uses more shader taps, it frequently introduces edge ringing artifacts and drives up GPU render times when your graphics card is under heavy DirectX 12 load.
3 Comments
7 Proven Fixes For OBS Not Capturing Audio From Desktop Or Headset (Ultimate Guide)
November 6, 20267 Proven Fixes For Streamlabs OBS Dropped Frames On Low End PC (Ultimate Guide)
November 6, 2026OBS Display Capture Not Working On Dual GPU Laptop: 5 Fixes (2026 V33+ Guide)
November 5, 2026