Quick Summary / The 30-Second Fix:
Fix OBS not capturing audio immediately by opening Windows Sound Settings (
Win + R, typemmsys.cpl), setting your headset as the default communication device, and matching your sample rates to 48kHz under the Windows Advanced tab and OBS Audio Settings.
Works on: Windows 11 (24H2 / 25H2 / 26H2) & Windows 10 | OBS Studio v33+ | RTX 50-series Blackwell | USB Headsets, Realtek Audio, SteelSeries Sonar, Elgato Wave, & NVIDIA Broadcast
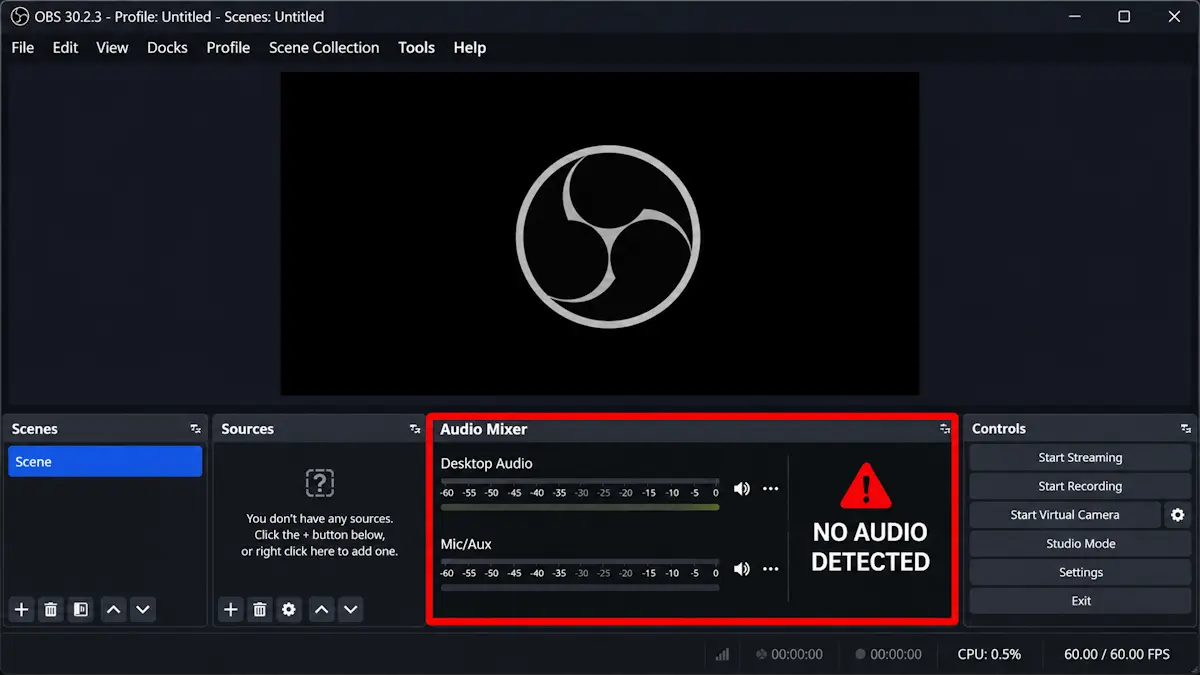
To resolve OBS not capturing audio issues, first isolate whether Windows blocks application capture permissions or if OBS listens to the wrong default audio endpoint. Checking the OBS Audio Mixer meters during a local recording reveals whether audio tracks are simply muted, unassigned, or blocked by Windows privacy restrictions.
Diagnosing OBS Not Capturing Audio
OBS Studio relies on Windows core audio APIs to pull game sounds and microphone inputs. Open your live audio mixer panel to pinpoint which input or output source is failing.
- Look at the Audio Mixer panel at the bottom of the OBS window while playing audio or speaking.
- Flat Green/Yellow Meter: Your hardware and Windows pass audio correctly, but stream track outputs might be unchecked.
- Completely Dead Black Meter: OBS isn’t receiving data from the selected audio device or Windows privacy locks disabled microphone access.
- Intermittent Stuttering Meter: Sample rate mismatch between Windows Sound Control Panel (44.1kHz vs 48kHz) causing audio buffer lockups.
| Diagnostic Symptom | Primary Core Cause | Sound Meter Status | Immediate 10-Second Fix |
| Zero Desktop Audio | Wrong Default Endpoint Selected | Completely flat / dead | Select specific device in Settings > Audio |
| Microphone Dead | Windows Microphone Privacy Lock | Completely flat / dead | Allow desktop apps access in Windows Privacy |
| Audio Out of Sync | Sample Rate Mismatch (44.1 vs 48kHz) | Jittery / freezing | Match Windows and OBS sample rate to 48kHz |
Fix 1: Assign Correct Audio Devices and Check Mute Toggles
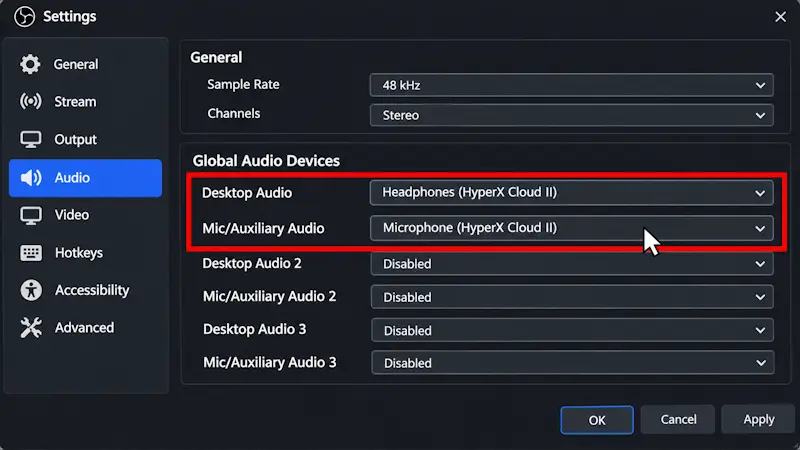
OBS often defaults to “Default” audio devices that shift dynamically when you plug in a USB headset or switch monitors. Manually pinning your specific hardware inside OBS settings stops OBS not capturing audio dropouts permanently.
- Open OBS Studio and click Settings in the bottom-right corner.
- Select Audio from the left sidebar menu.
- Under Global Audio Devices, locate Desktop Audio and select your exact headset or speakers from the dropdown.
- Under Mic/Auxiliary Audio, select your exact microphone (e.g., Microphone (USB Audio Codec) or Elgato Wave:3). Leave all other global slots on Disabled.
- Click Apply and OK, then check your main audio mixer meters.
- Verification: Speak into your mic or play a YouTube video; the green volume meter should bounce instantly.
If your audio meters bounce inside OBS but your stream hears nothing, your local playback tracks may be misrouted. Check our guide on [Internal Link Placeholder: fix OBS audio out of sync when streaming] for advanced track mapping tips.
Fix 2: Adjust Windows Sound Control Panel Default Endpoints

Windows 11 frequently routes audio through virtual endpoints while leaving OBS stranded on a disconnected physical port. Securing your default playback and recording devices in the legacy control panel prevents OBS not capturing audio glitches.
- Press
Win + Rto open the Run dialog, typemmsys.cpl, and hit Enter to open the classic Sound Control Panel. - On the Playback tab, right-click your primary gaming headset or speakers and select Set as Default Device and Set as Default Communication Device.
- Switch to the Recording tab, right-click your active microphone, and select Set as Default Device and Set as Default Communication Device.
- Click Apply and OK, then restart OBS Studio.
- Verification: Verify that a green checkmark appears next to your active hardware on both tabs in the Windows sound control panel.
If you stream desktop audio through an HDMI capture card, display scaling can occasionally break capture hooks. Read our walkthrough on OBS display capture not working on a dual GPU laptop for related capture troubleshooting.
Fix 3: Fix Sample Rate Mismatch Between Windows and OBS
When Windows outputs audio at 44.1 kHz while OBS listens at 48 kHz, audio buffers lock up and result in complete silence or severe robotic distortion.
Best Sample Rate Settings for OBS Not Capturing Audio
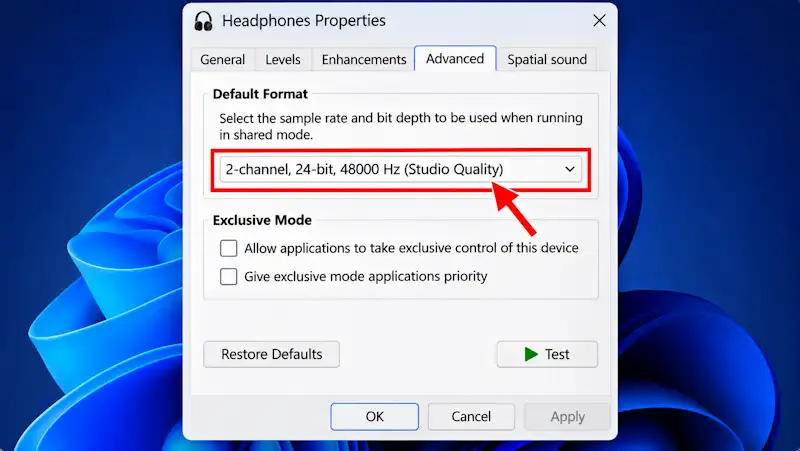
- Open the Windows Sound Control Panel (
mmsys.cpl), right-click your default playback device, and click Properties. - Open the Advanced tab under device properties.
- Set the Default Format dropdown to 2-channel, 24-bit, 48000 Hz (Studio Quality).
- Repeat the exact same process for your Microphone under the Recording tab properties (set it to 1-channel, 24-bit, 48000 Hz).
- Open OBS Studio, go to Settings > Audio, and ensure Sample Rate is explicitly set to 48 kHz.
- Set Channels to Stereo.
- Verification: Restart OBS and verify that audio monitoring channels play smoothly without audio clipping or total dropouts.
If your virtual camera output or microphone routing conflicts with Discord voice channels after changing sample rates, check our fix for the Discord not detecting OBS virtual camera fix.
Fix 4: Grant Windows Microphone Privacy Permissions

Windows 11 security protocols block desktop apps from listening to recording inputs unless explicit global permissions are toggled on. If privacy blocks are active, you will experience OBS not capturing audio from any connected microphone.
- Press
Win + Ito open Windows Settings. - Navigate to Privacy & security > Microphone from the left sidebar.
- Ensure the main toggle for Microphone access is turned On.
- Scroll down and ensure Let desktop apps access your microphone is turned On.
- Look through the app list below and verify that OBS Studio or OBS has explicit permission to use the microphone.
- Verification: Open OBS Studio and tap your microphone; the green audio meter should immediately jump.
If privacy toggles are enabled but your game capture hook still fails to render window audio or game visuals, review our guide on the OBS game capture black screen Windows 11 fix.
Fix 5: Add Application Audio Capture (Windows 11 Feature)
OBS Studio includes a native Application Audio Capture source that lets you target specific software (like Discord, Spotify, or a running game) directly without capturing your entire desktop sound card.
- Open OBS Studio, go to your Sources box, and click the
+(Add) icon. - Select Application Audio Capture (BETA) from the menu.
- Name your source and click OK.
- In the properties window, select the active target executable from the Window dropdown.
- Leave capture method on Window Audio Capture and click OK.
- Verification: Launch your selected game or app; the corresponding audio meter in OBS should move only when that specific program makes sound.
If your game or streaming connection drops packets entirely while capturing heavy application audio, follow our troubleshooting steps to fix dropped frames and disconnection issues in OBS Studio.
Fix 6: Advanced Audio Endpoint and Driver Resets
⚠️ Safety & Data Backup Warning: Back up your OBS scene collections (Profile > Export and Scene Collection > Export) before reinstalling audio drivers or editing Windows registry audio endpoints. Wiping audio drivers without a backup can reset custom VST filters, noise suppression chains, and channel routing.
If basic settings adjustments fail to resolve OBS not capturing audio errors, corrupted Realtek or USB audio drivers are usually blocking the Windows audio pipeline.
Step 1: Reinstall or Update Audio Drivers via Device Manager
Corrupted audio controller drivers prevent OBS from hooking into Windows core audio loops.
- Press
Win + Xand select Device Manager. - Expand Sound, video and game controllers.
- Right-click your primary audio device and select Uninstall device. Check the box to remove the driver software for this device.
- Disconnect your USB headset or audio interface, restart your PC, and let Windows automatically reinstall clean generic drivers upon reboot.
- Verification: Open OBS and confirm your audio input/output dropdowns successfully detect your hardware.
Step 2: Reset OBS Audio Cache and Configuration Files
Corrupted configuration files can lock audio filters and prevent device initialization.
- Close OBS Studio completely.
- Press
Win + R, type%appdata%\obs-studio, and press Enter. - Locate the
basicfolder, open your current profile folder, and back up youriniconfiguration files to your desktop. - Download the clean installer package directly from the Official OBS Studio Download page to refresh corrupted system files.
- Verification: Launch OBS fresh and check that audio devices initialize correctly without throwing error popups.
Common Mistakes to Avoid
- Leaving OBS Audio Devices Set to “Default”: Relying on Windows default audio routing means OBS will lose your microphone or desktop sound every time Windows updates an endpoint or you unplug a USB device.
- Mixing 44.1kHz and 48kHz Sample Rates: Forcing your microphone to run at CD quality while OBS runs at DVD quality introduces severe buffer overruns, resulting in choppy audio or complete capture failure.
Frequently Asked Questions (FAQs)
Why does OBS capture my voice but not desktop game audio?
This happens because your Desktop Audio device in OBS Settings is either disabled, set to an unplugged monitor speaker, or blocked by Windows spatial sound enhancements. Assign your physical headset explicitly under Settings > Audio > Desktop Audio to fix it.
How do I fix delayed or out-of-sync audio in OBS?
Audio sync drift is usually caused by a sample rate mismatch between your Windows Sound Control Panel and OBS Studio. Ensure both your Windows recording/playback properties and OBS Audio settings are locked to 48000 Hz.
Can I capture audio from only one specific application in OBS?
Yes, you can use the Application Audio Capture (BETA) source in OBS Studio to select and record audio from a single running program, such as Discord or a web browser, without capturing your entire Windows desktop sound.
What should I do if my microphone is completely greyed out in OBS?
If your mic is greyed out or silent, check your Windows privacy settings to ensure desktop apps have permission to use the microphone. Next, verify in the Windows Sound Control Panel that your microphone isn’t disabled or muted.