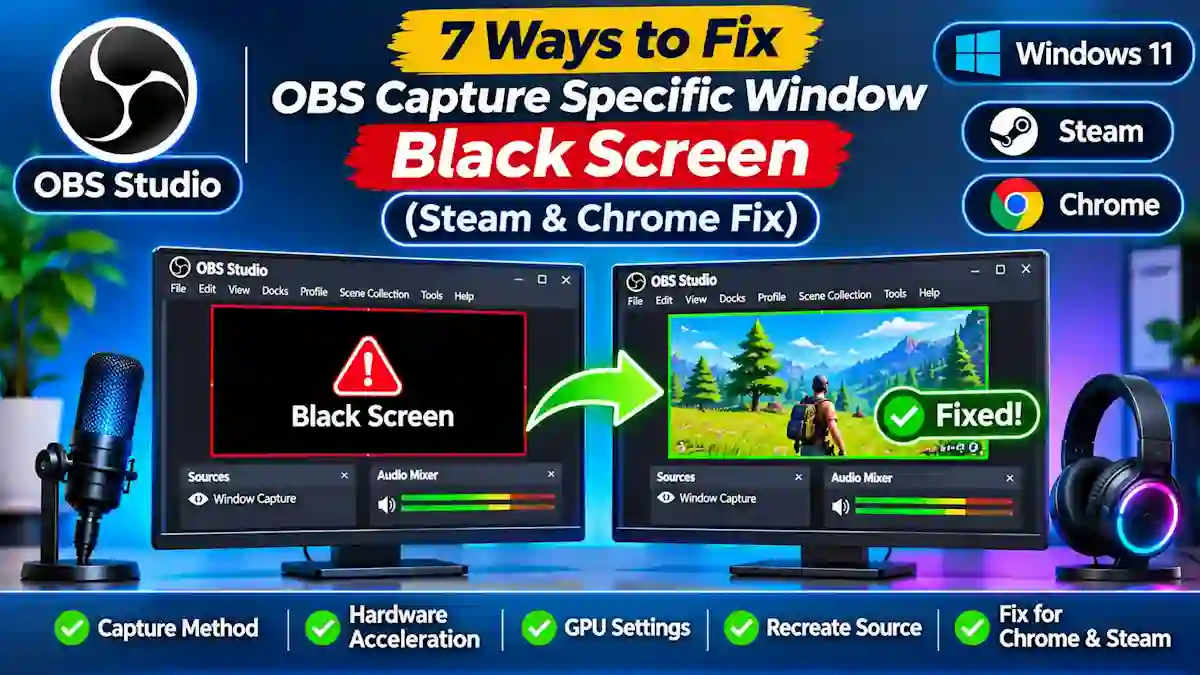
Instant Resolution: To instantly resolve the obs capture specific window black screen error, close OBS Studio completely, right-click its desktop shortcut, and select Run as Administrator. Next, double-click your Window Capture source inside OBS, change the Capture Method from Automatic to Windows 10 (1903 and up), and turn off Hardware Acceleration inside your target application (Chrome, Discord, or Steam settings).
- System Compatibility: Windows 11 (23H2 / 24H2) | Windows 10 (Version 1903+) | macOS Sonoma & Sequoia | OBS Studio v30, v31 & v32+
- Verified Hardware Architectures: NVIDIA GeForce RTX 30/40 & 50-Series (Blackwell), AMD Radeon RX 7000/8000-Series, Intel Arc Discrete GPU, Intel Core Ultra & AMD Ryzen platforms.
Diagnosing the OBS Capture Specific Window Black Screen Root Cause

Staring a blank canvas completely kills your live stream or recording momentum. To eliminate the obs capture specific window black screen error permanently, you must first pinpoint whether your capture hook is failing due to OS window compositing limits, application hardware sandboxing, or mismatched graphics processor routing.
Before diving into advanced troubleshooting, always check your diagnostic logs using this step-by-step workflow:
- Open the Performance Dock: Launch OBS Studio and click Docks > Stats from the top menu bar to open your real-time hardware diagnostic overlay.
- Analyze Rendering Lag Metrics: Monitor the “Frames missed due to rendering lag” counter while attempting to capture your specific target window.
- Isolate Hook Failures: If this counter remains completely flat at
0but your preview screen is pitch black, your PC’s performance is not the issue. Instead, the hook on the target application’s window handle (HWND) is entirely broken. - Identify Sandboxed UI Elements: Check if your target application utilizes an isolated Chromium Embedded Framework (CEF) sandboxing layer, which is the core architecture powering the modern Steam desktop UI, Google Chrome, Discord, and Spotify clients.
- Scan the Error Logs: Navigate to Help > Log Files > Upload Current Log File within OBS to analyze the background console logs.
- Pinpoint System Rejections: Scan the log text for critical error flags such as
[window-capture: 'Source Name'] capture failedorerror: DXGI swapchain initialization rejected. - Detect Multi-GPU Routing Conflicts: Verify if your setup is a hybrid graphics laptop or a dual-GPU desktop configuration running specialized multi-monitor arrays.
- Spot Integrated vs Dedicated Mismatches: Mismatched routing occurs when Windows automatically assigns OBS to your low-power integrated graphics chip (iGPU) while routing your resource-heavy game or browser to the high-performance dedicated graphics card (dGPU).
OBS Black Screen Symptoms & Fast Fixes
If you want a quick visual matrix to pinpoint why your obs capture specific window black screen error is happening, check the responsive breakdown below. It maps out the exact hardware/software symptoms, their underlying causes, and the immediate 10-second troubleshooting steps.
| Issue Indicator (Symptom) | Probable Cause | Rapid 10-Second Fix |
|---|---|---|
| Chrome / Edge Shows Black Window (With working cursor) | ANGLE graphics backend isolation and sandboxing layers blocking the OBS graphics hook. | Disable Hardware Acceleration inside Google Chrome/Edge settings. |
| Steam Client Shows Black Pane (Store, Friend List, or Library is blank) | Modern Chromium Embedded Framework (CEF) GPU rendering protection conflicts. | Turn off GPU accelerated rendering in the Steam client Interface settings. |
| Game Plays Audio Only (Video preview canvas stays completely dark) | BitBlt (GDI) legacy engine hook failure on modern DirectX 12 or Vulkan titles. | Open source properties and switch Capture Method to Windows 10 (1903 and up). |
| Dual-GPU Laptop Fails All Hooks (Integrated vs Dedicated GPU conflict) | Cross-GPU thread routing assignment mismatch between OBS Studio and the target app. | Assign OBS to High Performance within Windows Display Graphics Settings. |
| Antivirus or Anti-Cheat Blocks Feed (Security layer rejects window injection) | Missing elevated user account tokens and OS-level permission isolation policies. | Set the OBS executable file properties to permanently Run as Administrator. |
Step 1: Fix OBS Capture Specific Window Black Screen via Modern Graphics Capture
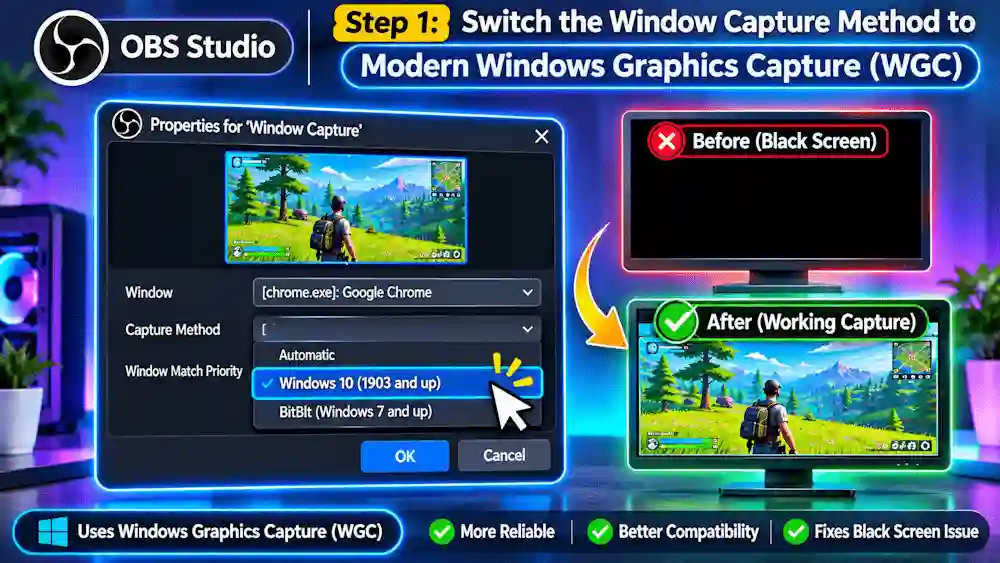
The default ingestion settings in OBS Studio often fallback to legacy BitBlt (Graphics Device Interface) rendering. Modern hardware-accelerated user interfaces completely bypass BitBlt hooks, causing the engine to render a blank dark canvas. Switching to the native Windows Graphics Capture (WGC) API bypasses this restriction immediately.
Follow these micro-steps to update your capture framework:
- Access Your Workspace: Launch OBS Studio and navigate directly to your primary Sources dock.
- Open Source Settings: Double-click your existing, misbehaving Window Capture source to open its properties canvas. (Alternatively: Click the + icon, choose Window Capture, and hit OK to build a clean source).
- Locate Engine Settings: Find the drop-down menu explicitly labeled Capture Method.
- Upgrade the API Hook: Switch the selection from Automatic or BitBlt (GDI) to Windows 10 (1903 and up). This engages the high-performance WGC/DXGI desktop duplication framework. (Technical Note: You can verify how this framework communicates over system pipelines by reviewing the official Microsoft DXGI Desktop Duplication API Portal).
- Re-Initialize the Target Application: Click the Window drop-down menu and re-select your specific target program (e.g., your Steam client or Google Chrome browser).
- Adjust Executable Priority: Set the Window Match Priority parameter to “Match title, otherwise find window of same executable” to prevent loss of source feed when the target app updates its title bar string.
- Maintain Viewer Interaction: Leave the Capture Cursor option checked so your streaming audience can easily follow your real-time mouse movements.
- Apply Configuration: Click the OK button at the bottom right to seal the properties edit.
- Perform System Refresh: If the stream preview doesn’t update immediately, minimize and restore your target window once to force a fresh DXGI graphics handshake.
(If switching capture methods causes broader feed dropouts across your entire desktop, make sure to read our core guide on How to Fix OBS Game Capture Black Screen Issues).
Step 2: Disable Hardware Acceleration in Google Chrome
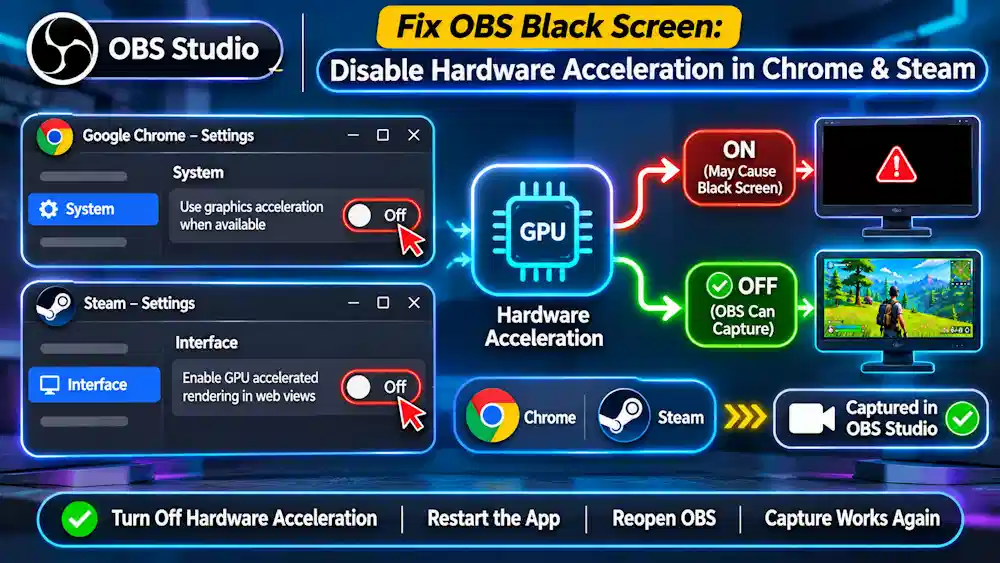
Google Chrome runs an isolated sandbox layer that blocks external software hooks from reading the active web page canvas. Turning off hardware acceleration forces the browser to render frames on standard display layers, instantly clearing the pitch-black preview screen.
Follow these simple steps to fix your browser capture feed:
- Launch the Browser: Open your Google Chrome window on your primary monitor.
- Open the Core Options: Click the three vertical dots in the upper-right corner of the interface.
- Access System Configurations: Select Settings from the menu, then click System in the left-hand column.
- Deactivate the Switch: Locate the toggle switch named “Use graphics acceleration when available” and flip it to Off.
- Restart the Browser: Click the Relaunch button next to the toggle to apply the changes immediately.
- Verify the Fix: Bring OBS Studio to the foreground and confirm your window capture feed is working perfectly.
Step 3: Disable GPU Rendering in Steam
The Steam desktop interface runs on a specialized Chromium sandboxing framework that completely isolates its user interface graphics. Turning off GPU acceleration inside the client bypasses this security barrier, allowing OBS to capture your library and storefront menus instantly.
Follow these direct steps to fix your Steam capture issues:
- Launch the Client: Open your Steam desktop application on your main screen.
- Open the Top Menu: Click the Steam menu button located in the absolute top-left corner of the window.
- Access App Settings: Select the Settings option from the drop-down menu list.
- Navigate the Interface: Click on the Interface tab located inside the left-hand sidebar navigation panel.
- Locate the Rendering Switch: Scroll through the right pane until you find “Enable GPU accelerated rendering in web views”.
- Deactivate the Acceleration: Flip the toggle switch to the Off position to drop the sandboxed hardware layer.
- Turn Off Hardware Decoding: Scroll down slightly further and switch “Enable hardware video decoding” to Off to eliminate unexpected frame drops.
- Relaunch the App: Click the Restart Now button at the bottom of the window to refresh the Steam client.
- Refresh Your Source: Re-link your Steam window inside your OBS properties box once the client boots back up.
Step 4: Configure Windows 11 GPU Allocation
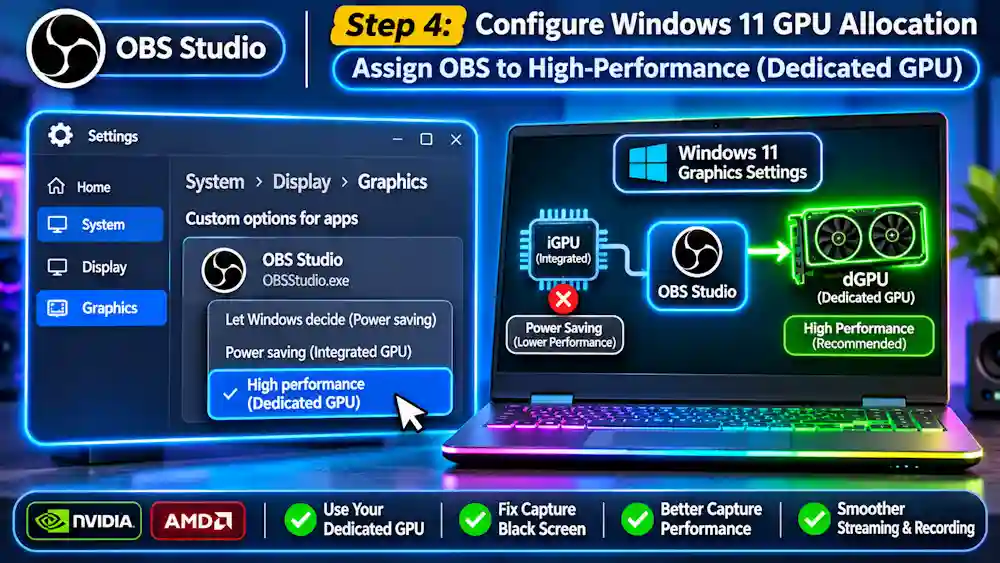
Hybrid graphics laptops often route software video feeds across separate internal display channels, causing catastrophic capture failures. Forcing both OBS Studio and your target application onto the same high-performance dedicated GPU layer fixes this thread routing issue permanently.
⚠️ Safety Precaution: Before tweaking these settings, make sure to back up your current configuration files just in case! Inside OBS Studio, click Scene Collection > Export and save a copy of your current scene layout directly to your desktop.
Follow these direct steps to align your system’s hardware routing:
- Open System Settings: Press the keyboard shortcut Windows Key + I to launch the main Windows Settings panel.
- Navigate to Display Layouts: Click on System in the left sidebar, then select Display from the right-hand panel.
- Access App Customization: Scroll down to the bottom of the Display panel and click on the Graphics sub-menu.
- Locate the Capture Software: Look through the installed application list under Custom options for apps for OBS Studio.
- Manually Add the Executable: If it is missing, click the Browse button and navigate to your installation folder (
C:\Program Files\obs-studio\bin\64bit\obs64.exe). - Open Hardware Preferences: Click on the OBS Studio list entry once it appears, then select the Options button.
- Engage Dedicated Graphics: Change the graphics preference toggle to High performance to select your discrete NVIDIA or AMD graphics card.
- Hardware Upgrade Note: Running multiple rendering pipelines requires maximum bandwidth. If you are still using legacy hardware, consider upgrading your setup using a certified high-bandwidth
Anker 8K HDMI 2.1 Cableto avoid physical cross-adapter display limits. - Save Your Settings: Click the Save button to confirm your hardware selection.
- Execute a System Restart: Restart your computer completely so the Windows Desktop Window Manager registers the unified hardware context.
Step 5: Grant Full Administrative Privileges
High-security processes and Windows security sandboxes enforce strict integrity level boundaries that silently block low-privilege software hooks. Forcing OBS Studio to run with elevated user account tokens allows the engine to easily pierce these security isolation walls.
Follow these direct steps to permanently elevate your capture software:
- Kill Background Instances: Close OBS Studio completely and ensure no lingering processes remain active inside your Windows Task Manager.
- Access Executable Properties: Right-click your OBS Studio desktop shortcut or the primary executable file inside your core installation directory.
- Open the Setup Context: Select the Properties option from the bottom of the drop-down context menu.
- Switch System Tabs: Click over to the Compatibility tab located along the top header bar of the properties dialog box.
- Toggle the Privilege Switch: Place a checkmark inside the configuration box explicitly labeled “Run this program as an administrator”.
- Commit Your Adjustments: Click the Apply button, then click OK to lock in the system changes and shut the window.
- Accept the Security Prompt: Launch OBS Studio using that specific shortcut and click Yes when the Windows User Account Control (UAC) prompt appears.
(Note: If missing administrative rights cause your software to close abruptly without warning, check out our master troubleshooting guide on How to Fix OBS Studio Crashing With No Error Message on Windows).
Step 6: Switch Games to Borderless Window Mode
Modern DirectX 12 and Vulkan titles seize exclusive control over your GPU’s swapchain pipeline when running in traditional Fullscreen mode, locking out external window capture tools. Forcing the game engine to render within a borderless window framework allows OBS to seamlessly read the display layer.
Follow these direct steps to fix game-specific display hooks:
- Launch the Target Title: Run the specific game that is currently triggering the blank dark canvas inside your streaming setup.
- Access the Game Options: Open the game’s internal primary Options or Settings menu.
- Locate Display Variables: Navigate directly to the Video, Graphics, or Display configuration tab.
- Find the Window Setting: Locate the dropdown selection menu explicitly labeled Display Mode or Window Mode.
- Drop Exclusive Fullscreen: Change the graphics selection from Exclusive Fullscreen to Borderless Windowed (or Windowed Fullscreen).
- Align Project Resolutions: Ensure the chosen in-game display resolution precisely matches your OBS Canvas base resolution setting (e.g., 1920×1080 or 2560×1440).
- Confirm the Signal Feed: Apply the graphics changes inside the game, tab back over to OBS Studio, and verify that the video stream renders perfectly.
Step 7: Disable Hardware-Accelerated GPU Scheduling (HAGS)
Windows uses specialized GPU resource scheduling to manage VRAM directly, but this process frequently disrupts DXGI graphics surface sharing between separate desktop applications. Deactivating this OS-level scheduling queue allows OBS Studio to hook into specific window frame allocations without getting blocked by the Windows kernel.
Follow these direct steps to disable the background scheduling layer:
- Launch OS Preferences: Press the Windows Key + I keyboard shortcut to quickly launch your main Windows Settings menu.
- Navigate the Sub-Menus: Click on System in the left sidebar, select Display on the right, and click on Graphics.
- Access Default Variables: Click on the link near the top of the interface labeled “Default graphics settings” (or “Change default graphics settings”).
- Locate the System Toggle: Find the specific setting labeled Hardware-accelerated GPU scheduling.
- Deactivate the Architecture: Flip the master toggle switch to the Off position.
- Execute a Cold Kernel Reboot: Restart your computer completely so the Windows operating system can reconfigure your display driver pipeline.
- Verify the Graphics Hook: Launch your setup after the desktop reboots and test your specific window capture source to confirm the fix.
(If you are setting up complex multi-app overlays or virtual camera routing once your graphics scheduling is disabled, make sure to read our workflow tutorial for Resolving OBS Virtual Camera Not Showing Up in Discord or Zoom).
Common Mistakes to Avoid
Even after applying the right system configurations, minor operational oversights can completely break your video ingestion pipelines. Avoid these two frequent mistakes to ensure your capture feeds remain perfectly stable throughout your broadcast:
- Minimizing the Target Window: Clicking the minimize button forces the OS to immediately freeze all graphical frame updates to save hardware resources, instantly triggering an obs capture specific window black screen error. Keep your target applications running in the background or shift them to a secondary monitor display instead.
- Stacking Conflicting Capture Sources: Placing both a Display Capture and a Window Capture for the same program inside a single active scene triggers internal graphics hook race conditions. Keep your media sources completely isolated by creating separate, dedicated scenes for full desktop sharing and specific app window captures.
- Workflow Optimization Tip: Streamers running advanced scenes often benefit from mechanical hotkey controls. Utilizing a physical external execution deck like the
Elgato Stream Deck MK.2prevents the need to constantly Alt-Tab, completely eliminating accidental window minimization issues.
Frequently Asked Questions
- Why does OBS show a black screen on Chrome while browser audio plays perfectly?
- Audio and video run through completely separate OS subsystems.
- Browser audio hooks directly into the Windows WASAPI audio engine without touching your system’s rendering cards.
- The obs capture specific window black screen error occurs because Chrome isolates its visual interface within sandboxed graphics layers.
- You must disable hardware graphics acceleration within Chrome’s system settings to expose the canvas frames to OBS.
- Is Window Capture better than Game Capture when streaming modern Steam games?
- Game Capture remains the superior choice for modern 3D games because it injects directly into native DirectX 12 or Vulkan pipelines.
- Direct graphics hook injection provides maximum rendering efficiency and eliminates input lag.
- Only switch to Window Capture (using the modern Windows 10, 1903 and up method) if strict third-party anti-cheat engines block the direct hook.
- Will disabling Hardware-Accelerated GPU Scheduling (HAGS) drop my gaming FPS?
- Turning off HAGS results in a completely negligible performance impact (typically under a 1% to 2% difference on modern rigs).
- Modern configurations running NVIDIA RTX 40/50-Series or AMD Radeon graphics will not experience noticeable frame rate dips.
- Deactivating HAGS completely eliminates desktop window compositor race conditions, permanently resolving sudden frame drops and preview freezes.
5 Comments
7 Proven Ways To Fix Dropped Frames And Disconnection Issues In OBS Studio (2026 Guide)
November 3, 20265 Working Fixes For OBS Studio 33.0.0 Crash Fix & Discord Black Screen (2026 Guide)
November 1, 20265 Working Fixes: Discord Not Detecting OBS Virtual Camera & Startup Crashes
October 30, 2026Fix Capture Card Black Screen In OBS: 5 Console Streaming Fixes (2026)
October 29, 20267 Ways To Fix OBS Game Capture Black Screen On Windows 11 (2026 Guide)
October 28, 2026