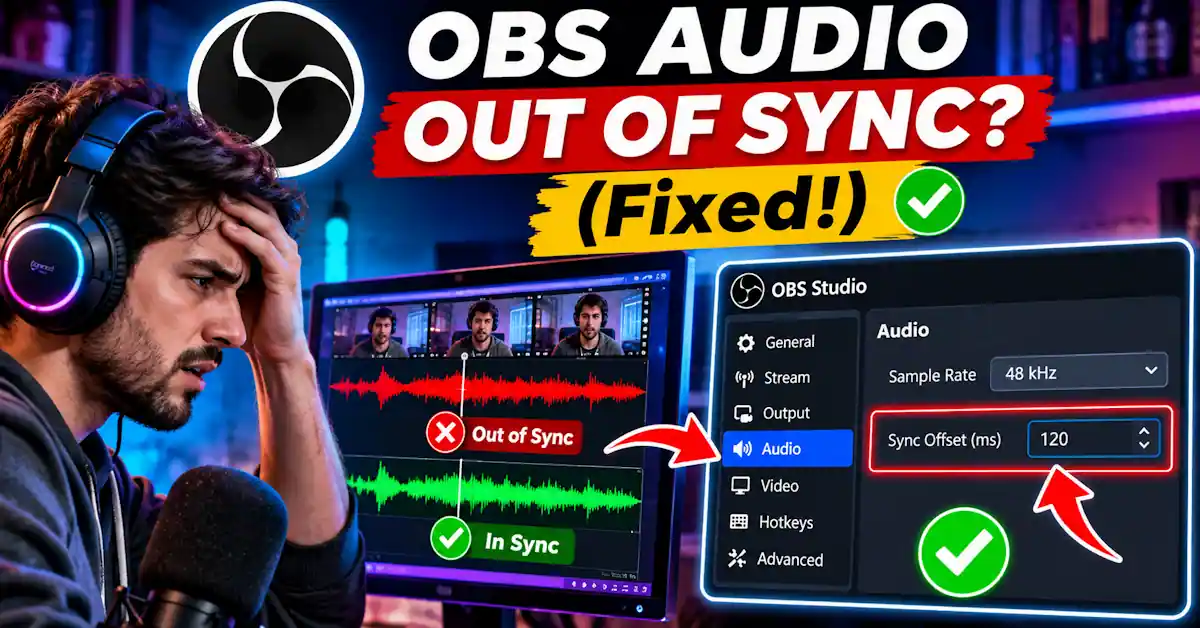
Quick Summary / The 30-Second Fix:
Fix an OBS audio out of sync error immediately by matching your Windows Sound Control Panel sample rate (48 kHz) to your OBS Studio audio settings. Next, audit Use Device Timestamps inside your Desktop Audio source properties and dial in a manual millisecond delay under Advanced Audio Properties > Sync Offset.
Works on: Windows 11 (24H2/25H2/26H2) / Windows 10 / macOS / OBS Studio v32 & v33+ / NVIDIA RTX 40 & RTX 50-Series (Blackwell) / AMD Radeon RX 7000 & 8000 Series.
Diagnostic Matrix: Symptoms, Bottlenecks & 10-Second Fixes
Streamers waste hours guessing which slider to pull when their broadcast audio desynchronizes. Match your exact broadcast symptom to its most common pipeline bottleneck below before changing your configuration.
| Broadcast Symptom | Most Common Pipeline Bottlenecks | Immediate 10-Second Solution |
| Audio drifts gradually over 20+ minutes | Sample rate mismatch (44.1 kHz vs. 48 kHz) | Lock both Windows Sound and OBS Audio settings to 48 kHz. |
| Voice happens before lips move (Constant) | Low-latency USB/XLR mic beats HDMI capture card, high-res webcam, or slow low-light camera exposure | Add a positive Sync Offset (+50ms to +200ms) or disable webcam Low-Light Compensation. |
| Lips move before voice plays (Constant) | Look-ahead DSP/VST plugins, multi-hop virtual cables (Voicemeeter), or Bluetooth audio buffers | Add a negative Sync Offset (-50ms to -200ms) or add a Video Delay (Async) filter. |
| Audio desyncs suddenly mid-stream | Faulty Windows WASAPI hardware clock or USB DPC latency spikes | Uncheck Use Device Timestamps on your Desktop Audio output source. |
| Console audio lags behind Elgato/capture card | DirectShow audio buffer mismatch over USB 3.x | Keep mode on Capture audio only, check Use custom audio device, and select the card’s digital endpoint. |
Step 0: Diagnose the Root Cause Before Touching Settings
Don’t blindly type random millisecond numbers into your mixer without verifying why your pipeline is choking. Use OBS Studio’s internal diagnostic tools to pinpoint whether you’re fighting clock drift, GPU rendering lag, or hardware latency.
- Open the OBS Stats Dock: Navigate to the top menu bar and click Docks > Stats to monitor real-time pipeline performance.
- Check for Rendering and Encoding Lag: Look at Frames missed due to rendering lag and Skipped frames due to encoding lag; if either exceeds 1%, your GPU or CPU is starving and delaying video frames behind your audio track. (If your system is redlining, follow our dedicated guide to fix OBS Studio high CPU usage and encoding overloaded errors before adjusting audio sliders).
- Run the Official OBS Log Analyzer: Record a 30-second test stream, stop the broadcast, and click Help > Log Files > Upload Current Log File.
- Scan for Audio Buffering Ratchets & the 45-Tick Ceiling: Paste your log URL directly into the Official OBS Log Analyzer and check for
total audio buffering is now X mslines. Because OBS processes audio in 1,024-sample ticks with a hard ceiling of 45 ticks, hitting the maximum cap of 960 ms (at 48 kHz) or 1,044 ms (at 44.1 kHz) confirms a severe USB/driver stall or CPU starvation event. - Perform the Local Clap Test: Record yourself clapping once sharply on camera, then watch the local MKV/MP4 file—never judge sync from a browser preview, especially if you’re also troubleshooting a Twitch Error Code 2000 network playback glitch on Chrome—to verify if the sound hits early or late.
Fix 1: Lock Windows & OBS Audio Sample Rates to 48 kHz (Stops Progressive Drift)
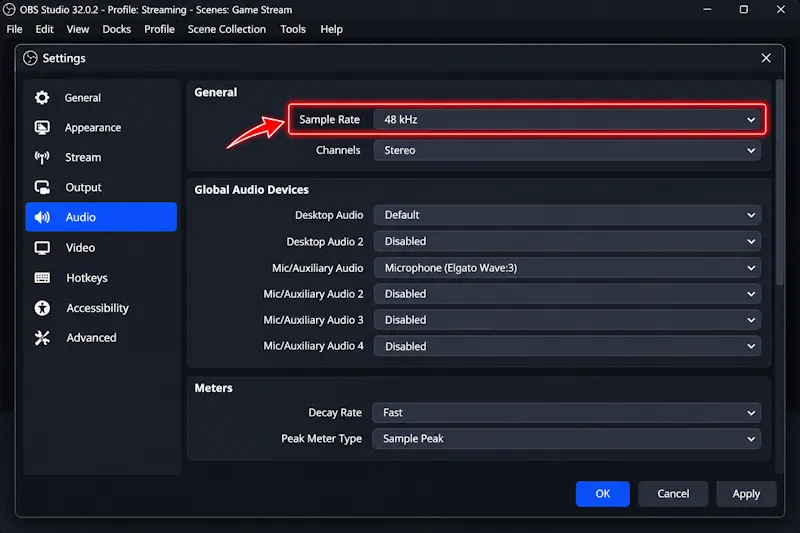
When your microphone captures at 44.1 kHz (44,100 samples per second) while OBS processes audio at 48 kHz (48,000 samples per second), the math doesn’t line up. That fractional mismatch causes a progressive OBS audio out of sync drift that gets worse every minute you stay live.
- Open the Legacy Windows Sound Control Panel: Press
Win + Ron your keyboard, typemmsys.cpl, and hit Enter. - Audit Your Playback Devices: Under the Playback tab, right-click your default headset or speakers and select Properties.
- Set Output Frequency to 48 kHz: Click the Advanced tab, click the Default Format dropdown menu, and select 2 channel, 24 bit, 48000 Hz (Studio Quality).
- Disable Audio Exclusive Mode: Uncheck Allow applications to take exclusive control of this device in the same window so games can’t hijack your audio buffer rate, then click Apply.
- Audit Your Recording Devices: Switch to the Recording tab in the Sound window, right-click your primary USB or XLR interface microphone, and click Properties.
- Match Input Frequency to 48 kHz: Go to the Advanced tab, set the dropdown to 48000 Hz (Studio Quality), uncheck Exclusive Mode, and click OK.
- Align OBS Studio Internal Audio: Open OBS Studio and navigate to File > Settings > Audio.
- Lock the OBS Sample Rate: Set the top Sample Rate dropdown to 48 kHz, click Apply, and restart OBS Studio completely to lock in the kernel audio frequency.
Fix 2: Correctly Configure “Use Device Timestamps” in OBS Audio Sources
In OBS Studio’s WASAPI engine (win-wasapi), output captures and input captures handle hardware clocks differently by default. Knowing which box to uncheck prevents sudden 500ms audio jumps mid-game without breaking virtual audio routing.
- Audit Desktop Audio Timestamps (
win-wasapiOutput): Click the three vertical dots (⋮) > Properties next to Desktop Audio (Audio Output Capture), where Use Device Timestamps is checked by default. Uncheck it if your OBS log shows clock drift orMax Audio Bufferingwarnings tied to your USB headset or motherboard speakers. - Verify Microphone Input Timestamps (
win-wasapiInput): Open Properties for your Mic/Aux (Audio Input Capture) channel. OBS leaves Use Device Timestamps unchecked by default for microphone inputs so it can stamp packets cleanly upon arrival—verify it remains unchecked unless you run a studio ASIO/WDM interface with a dedicated master word clock. - Leave Virtual Cables & Network Streams Alone: Do not alter timestamp settings on virtual audio cables (Voicemeeter/Wave Link) unless diagnosing a specific buffer underrun, and manage NDI/RTMP sync strictly inside their dedicated Sync or Network Buffering properties.
Fix 3: Calibrate Millisecond Timing Using Sync Offset (For Constant Delay)
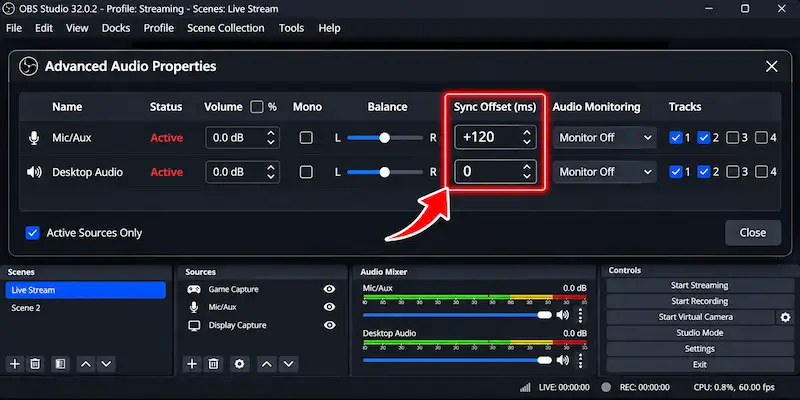
USB microphones send raw audio data to your PC almost instantaneously (1–5ms), while high-resolution webcams and HDMI capture cards take 50ms to 250ms to decode and render video frames. Because your voice arrives before your video frame finishes rendering, you must delay the audio to let the video catch up.
- Open Advanced Audio Properties: Click the Gear icon (or three vertical dots) at the bottom of the Audio Mixer dock and select Advanced Audio Properties.
- Identify the Sync Offset Column: Locate your microphone row and find the Sync Offset input box (measured in milliseconds, where
1000 ms = 1 second). - Delay Early Audio (Voice Ahead of Video): If your voice plays before your mouth moves, enter a positive value between
50 msand200 ms(e.g.,120 msis the standard sweet spot for Elgato Cam Link and USB webcams). - Disable Webcam Low-Light Auto-Exposure: If your camera delay fluctuates wildly, double-click your webcam in Sources, click Configure Video > Camera Control, and uncheck Low-Light Compensation so your camera doesn’t drop from 60fps to 15fps in dark rooms. (If you pass this synced feed to Discord or Zoom and hit a blank feed, check our guide to fix OBS Virtual Camera not showing up).
- Pull Back Late Audio (Video Ahead of Voice): If your mouth moves before your voice plays, enter a negative value (e.g.,
-100 ms) to shift the audio track backward in the stream buffer. - Delay the Video Source (If Negative Offset Isn’t Enough): If your audio is heavily delayed by external VST plugins and negative offset doesn’t catch it, right-click your Video Capture Device in the Sources box, click Filters > + (Add) > Video Delay (Async), and add a
50 msto150 msdelay to your camera instead.
Fix 4: Reconfigure Capture Card & Browser Source Audio Routing
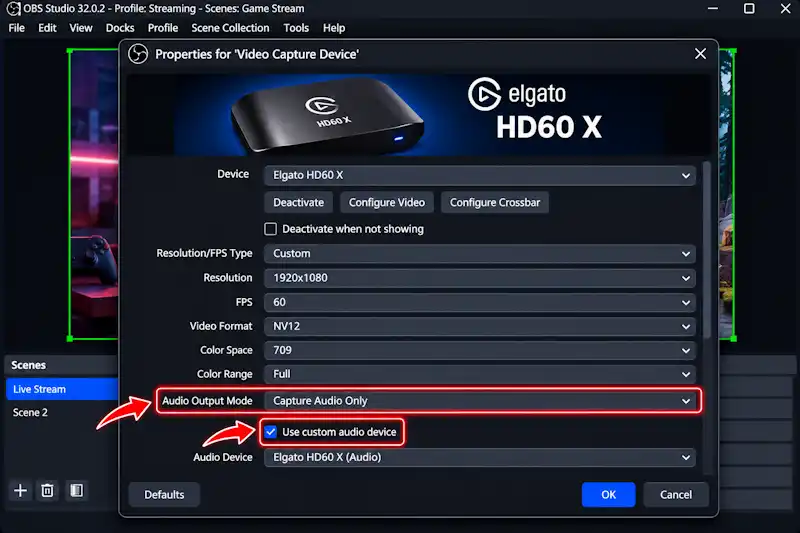
Console streamers using external USB capture cards (Elgato HD60 X, 4K X, or AVerMedia) often experience an OBS audio out of sync bug after 30 minutes of gameplay due to DirectShow buffer drift. (If your console feed shows no picture at all alongside missing sound, start with our guide to fix capture card black screen errors in OBS).
- Keep Capture Mode on “Capture Audio Only”: Double-click your Video Capture Device (capture card) in the Sources dock, scroll down to Audio Output Mode, and leave it strictly set to Capture audio only. Never switch this dropdown to DirectSound or WaveOut, as those legacy DirectShow APIs route audio outside OBS’s mixer and inject severe 100ms+ buffer delay.
- Link the WASAPI Endpoint Directly: Scroll to the very bottom of the same capture card properties window, check Use custom audio device, and select your capture card’s digital audio interface from the Audio Device dropdown.
- Alternative Dedicated WASAPI Input Method: If DirectShow still drifts after an hour, uncheck Use custom audio device, mute the capture card in your Audio Mixer, click + (Add) > Audio Input Capture in the Sources dock, and add your Elgato/AVerMedia card as a standalone WASAPI audio source.
- Isolate Browser Source Audio: If your stream alerts or music widgets are lagging, double-click your Browser Source, check Control audio via OBS, and click OK so OBS manages the buffer directly in the Audio Mixer.
System Stability & Configuration Backup Warning
Before modifying Windows CPU/GPU scheduling priorities, resetting WASAPI audio endpoints, or performing a clean GPU/audio driver installation in Fixes 5 and 6, back up your OBS setup. In OBS Studio, click Profile > Export and Scene Collection > Export to save your layouts to a safe folder. Additionally, create a manual Windows System Restore Point (Win + R – type sysdm.cpl – System Protection – Create) in case a driver rollback causes OS instability.
Fix 5: Eliminate GPU Preemption Starvation & CPU Thread Throttling
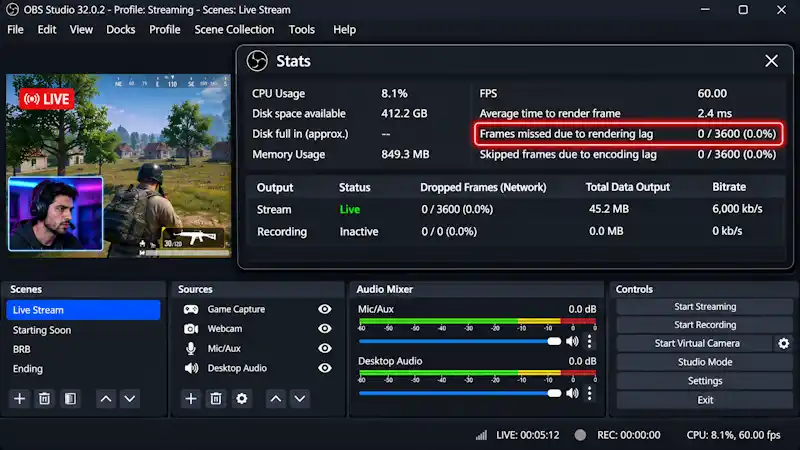
When a modern DirectX 12 title pins your GPU utilization at 99%, Windows starves OBS Studio of the resources required to composite scenes on time. The video compositor stutters, frames drop, and your unaffected real-time audio track races ahead of your frozen video frames. (If DirectX hooks conflict and show a blank gameplay window during this process, follow our steps to fix OBS Game Capture black screen issues).
- Run OBS as Administrator (For GPU Preemption): Close OBS, right-click your OBS Studio shortcut, select Properties > Compatibility, and check Run this program as an administrator. This grants OBS permission to execute Windows’
D3DKMTSetProcessSchedulingPriorityClasskernel call, locking in real-time GPU scheduling priority so heavy games can’t starve your video compositor. - Raise OBS Process Priority (For CPU Thread Scheduling): Navigate to File > Settings > Advanced > General and set Process Priority from Normal to Above Normal so the Windows kernel prioritizes OBS’s CPU audio and encoding threads over background apps.
- Test HAGS Only If Your Stats Dock Shows Rendering Lag: Hardware-Accelerated GPU Scheduling (HAGS) does not touch Windows audio clocks, but on some systems it causes GPU scheduling contention that starves OBS of video rendering frames. If Frames missed due to rendering lag exceeds 1%, go to Windows Settings > System > Display > Graphics > Advanced graphics settings and toggle Hardware-accelerated GPU scheduling to test stability (note that RTX 40/50-series owners must keep HAGS On if using DLSS Frame Generation; in that case, cap your in-game framerate 10% below your monitor’s refresh rate instead).
- Switch to Dedicated Hardware Encoding: Go to File > Settings > Output > Output Mode: Advanced > Streaming and set your Video Encoder to NVIDIA NVENC H.264 / AV1 (or AMD HW), removing video compression load from your CPU threads.
Fix 6: Resolve DPC Latency, USB Bandwidth Contention & Driver Corruption
If you’ve matched sample rates and configured timestamps yet still battle an OBS audio out of sync issue, your motherboard’s USB host controller or audio driver is suffering from Deferred Procedure Call (DPC) latency spikes. Severe driver corruption can even shut down your broadcast unexpectedly—if OBS closes without warning, check our guide on how to fix OBS Studio crashing with no error message on Windows.
- Separate High-Bandwidth USB Devices: Unplug your USB microphone or audio interface from the hub shared by your webcam or capture card, and plug it directly into a separate root USB port on the back of your motherboard (ideally a USB 2.0 port for audio, leaving USB 3.2 Gen 2 ports for video).
- Disable USB Selective Suspend: Open Control Panel > Hardware and Sound > Power Options, click Change plan settings next to your active High Performance plan, select Change advanced power settings, expand USB settings > USB selective suspend setting, and set it to Disabled.
- Update Your GPU & Audio Drivers Cleanly: Download the latest Studio or Game Ready package directly from the Official NVIDIA GeForce Drivers Page and choose Custom Installation > Perform a clean installation to reset corrupted HDMI/DisplayPort audio drivers.
- Refresh the Windows Audio Stack: If motherboard Realtek or USB audio drivers glitch after a Windows 11 update, follow the Microsoft Support Audio Driver Update Guide or run the built-in diagnostic via the Microsoft Windows Troubleshooters Portal to clear stuck kernel audio endpoints.
2 Common Mistakes Streamers Must Avoid
- Testing Audio Sync via OBS “Audio Monitoring” (Headphone Echo): Never try to judge your stream’s sync by turning on Monitor and Output in Advanced Audio Properties while speaking live; the Windows monitoring path introduces its own local buffer latency that doesn’t reflect what your viewers hear on Twitch or YouTube. Always record a local 15-second MKV/MP4 test video and watch it back in VLC Media Player.
- Stacking High-Latency Mastering VST Plugins on Live Mic Channels: Slapping studio mastering plugins (like iZotope Ozone, linear-phase EQs, or heavy AI noise suppression filters) onto your OBS mic chain adds massive look-ahead buffer delays. Keep live broadcast filters lightweight using OBS’s native RNNoise suppressor, 3-band EQ, and standard Compressor.
Frequently Asked Questions (FAQs)
Why does my OBS audio start in sync but slowly drift off over time?
Progressive audio drift happens when your Windows recording/playback devices and OBS Studio run at different sample rates—specifically when one is set to 44.1 kHz and the other is locked at 48 kHz. It can also happen when Use Device Timestamps is left enabled on a Desktop Audio output device whose internal crystal oscillator drifts under thermal load. Locking all devices to 48 kHz and unchecking Use Device Timestamps on Desktop Audio permanently stops progressive drift.
Should my OBS Sync Offset be a positive or negative number?
Use a positive number (e.g., +100 ms) when you hear your voice or gunshots before you see the action on screen; this delays the audio track so your slower video frame can catch up. Use a negative number (e.g., -100 ms) when you see your lips move or a gun fire before you hear the sound, pulling the delayed audio backward in the recording buffer.
Why is my Elgato capture card audio out of sync in OBS Studio?
External HDMI capture cards take several milliseconds to decode uncompressed video frames over USB 3.x, and Windows DirectShow often mismanages the embedded HDMI audio buffer over long sessions. Fix this by opening your capture card’s Properties in OBS, keeping Audio Output Mode set to Capture audio only, checking Use custom audio device at the bottom, and selecting the capture card’s digital audio input directly.
1 comment
7 Proven Fixes For Streamlabs OBS Dropped Frames On Low End PC (Ultimate Guide)
November 6, 2026